My BFF Megan (here is her blog) recently developed a passion for stamp-making. She went nuts going around making adorable, custom stamps for everyone with their favorite thing, she made me an AVOCADO! Anyway she offered to teach me her ways and we spent a rainy Sunday stamp-making and documentary watching for 8 HOURS! I love making stamps!!! I made a unicorn, a koala playing a ukulele and finally, my masterpiece, Snooki thinking about a pickle. The other day while dreaming about stamps I had an awesome idea! I thought wouldn’t it be cool if I could just stamp a page every time I wanted to make a fashion drawing. Anyway, that’s what this post is about.
Firstly, you’re going to need supplies. I bought this kit at my local art store for about $14. It has a carving tool with two different heads and a sheet of rubber. 
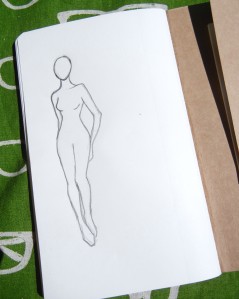
Then you’re going to need a pencil drawing. If you don’t feel comfortable freehand drawing one, that’s totally ok, you can trace one! 
Cool! Now you need to transfer your drawing onto the rubber stamp material. You can do this by laying your drawing face down on the rubber and then rubbing the back with the side of your pencil like this: 
Mine came out a little fuzzy, so I went through with a pencil and sharpened up the lines. 
Now you’re ready to start carving!  You need to leave a small ridge where all the pencil lines are.
  I started by doing the small detail work.
  After you get the outline you can start carving out the meat of it!
  Careful in small places!
  And then that’s it! You’re ready to start stampin’!
  You can mount your stamp on a piece of wood for more accurate and even stamping.

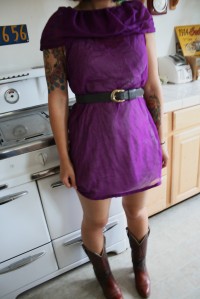
This is a tutorial for the little lace dress I made a while back. This time I made it with a purple voile. It is designed to be easy to make and wear, you can probably bust one of these suckers out in a few hours. It fits loosely and you can take it on and off without any buttons or zippers. This dress would work in almost any fabric… knits, wovens, you name it… but I have to say, I prefer how it turned out in the lace. A fabric with a little weight and drape to it also serves this dress well.
In my descriptions I tried to add links wherever possible for added help. So here goes…
You will need:
- some pattern paper (I used some old wrapping paper)
- scissors, measuring tape, ruler, pencil, pins, etc.
- roughly 2 yards of fabric (measure the total length that you want your dress to be, from shoulder to hem and double it, add 4″ or so to be safe
Making your pattern:
 Measure the full desired length for your dress from shoulder to hem, mark this length on the edge of pattern paper
- Measure from nipple to shoulder mark length on edge of paper

- Measure your bust at its fullest point. divide it by 4 and add 1″ (example: 36/4+1=10). Draw a line this length starting at the point you marked in step 2. (the green line in the picture)
- Measure across the front of your chest (armpit to armpit) and divide by 2. Draw a line this length starting at the top mark you made in step 1.
- Measure the top of your shoulder to the fullest part of your hips and mark that along the side of your pattern paper.

- Measure the fullest part of your hip, divide it by 4 and add 2″ (example: 40/4+2=12). Draw a line this length from the mark you made in step 5.
- Round out your armhole at the top and the hem at the bottom, connect your lines to create the outline of your piece! Yay you’re done! Cut out your piece and get ready for some sewing!
Sewing Instructions:
- Place the flat edge of your pattern piece on the fold of your fabric and cut out, this will be the front of your dress. Repeat to make back piece. Cut out a rectangle of fabric about 10″ x 60″, this will be your collar.
- Lay front and back pieces right sides together and sew up side seams. Don’t forget to finish your seams, Here is a helpful list of options.
- Now you need to finish your armholes. This is an awesome tutorial on how to do a really tidy bias tape finish. I opted for a more time effective approach of just turning and stitching twice.

- About a 1/2″ from the top of your armholes do a short 1/2″ or so stitch to join the front and back at the shoulder.
- Take your collar piece and sew the edges together making a large loop. Gather this down to the size of your neck opening.
- Pin gathered collar to neck opening WRONG SIDES TOGETHER. Stitch. Finish seam. The collar will fold down over the seam you made, so it won’t really be seen.

- Finish edge of collar, hem the bottom and add in your own creative ideas. Maybe some applique or embroidery…cute trim… a matching belt (or go belt-less), the possibilities are endless.


I am new to making tutorials and would LOVE your feedback! If you have any questions or comments please leave a comment below. Thank you so much of looking and have fun sewing!
Every year I get overly ambitious and try to make my mom something crazy and complicated, and every year I fail to finish on time! Most years she ends up getting her present around Father’s day. And once again I find myself in the same predicament, less than a week from Mother’s day and I am yet to start anything. I was thinking about possibly making her a pair of sweet house slippers, maybe something like these…  They are a project someone did on BurdaStyle.com here is the URL for the pattern, I’m 85% confident that I’m going to get these done. I’ll keep you guys posted on how this plays out…
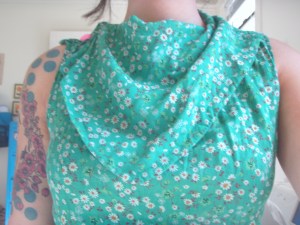
This is the perfect for when a regular collar just won’t cut it….look like an outlaw in any outfit… add it to your next project or to and existing top that needs a little sprucing!
So here goes my first tutorial ever…
 A= length around the front of your neckline (shoulder seam to shoulder seam + 5/8″ seam allowance on both sides
B= desired collar length (mine is 6″) + 5/8″ seam allowance on top and bottom
C= length around the back of your neckline + 5/8″ seam allowance on both sides
D= Same as B, desired collar length
- Draw out your pattern pieces (collar front and collar back) on a large piece of paper.
- Pin pattern to fabric and cut out two of each piece.
- Once your pieces are cut out pin collar front to collar back and sew side B to side D right sides together, repeat for second set of pieces. You now have a top collar and a bottom collar.
- Pin top collar to bottom collar right sides together, sew all the way around only leaving bottom edge open (side A/C).
- Now you’re ready to attach your collar and there are a few ways of going about this…. you can sew it on wrong sides together, do some sort of seam finish on it, flip the collar over and call it good (no one will ever see your seam because the collar is so big… or… you can turn side A/C of bottom collar in 3/8″ and press it, sew top collar to garment and then hand sew bottom collar onto garment creating a perfect beautiful collar.
Once again, this is the first tutorial I have ever made and I hope that it is helpful to you… if you have ANY questions please ask!


